
.jpg)
Customizing print formats in ERPNext is essential for companies that want branded invoices, quotations, delivery notes, receipts, and other documents. Instead of using the default layout, ERPNext allows you to build completely custom templates using HTML and Jinja. This means you can insert your company logo, add extra fields, control the layout, and generate clean PDFs that match your brand.
In this technical guide, we will walk through the complete workflow of customizing print formats in ERPNext, using the Sales Invoice as an example. The steps shown in this article correspond exactly to the ERPNext screens in the screenshots.
- How to access and manage Print Formats in ERPNext
- How to create a new custom print format for Sales Invoice
- How to use HTML + Jinja inside the print format editor
- How to insert a logo, company details, customer details, and invoice table
- How to add GST, terms & conditions, and footer messages
- How to handle common errors such as missing fields (e.g.,
letter_head_image)
1. Opening the Print Format List
To start, log in to ERPNext with an account that has System Manager or Administrator privileges. Then navigate to:
Home » Settings » Printing » Print Format
This opens the Print Format list. Here you can see all formats that exist in the system for different doctypes, such as Sales Invoice, Purchase Invoice, Delivery Note, Salary Slip, etc. You can enable/disable formats and also create your own custom ones.
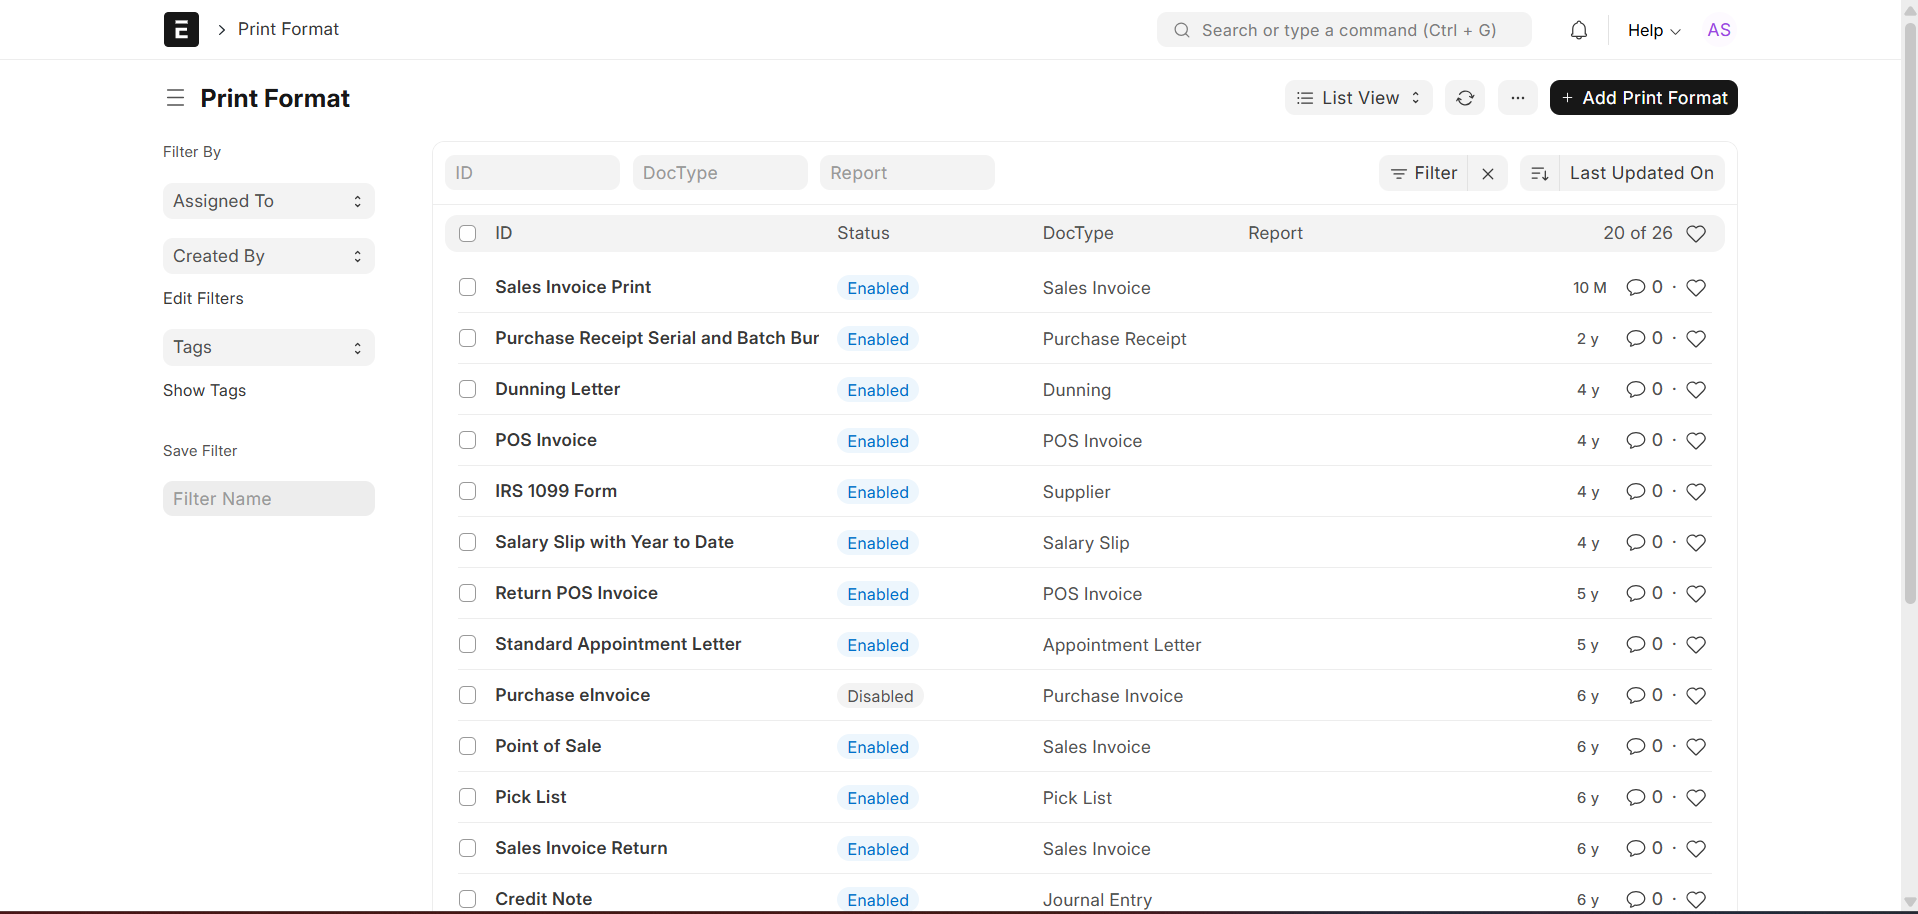
Each row represents one format and shows the status (Enabled/Disabled), the linked DocType, and meta information such as when it was last updated. To build a new layout, we will create a fresh print format specifically for Sales Invoice.
2. Creating a New Custom Print Format
Click on the “Add Print Format” button in the top right corner. ERPNext opens a new form where you configure the basic settings of your custom print format.
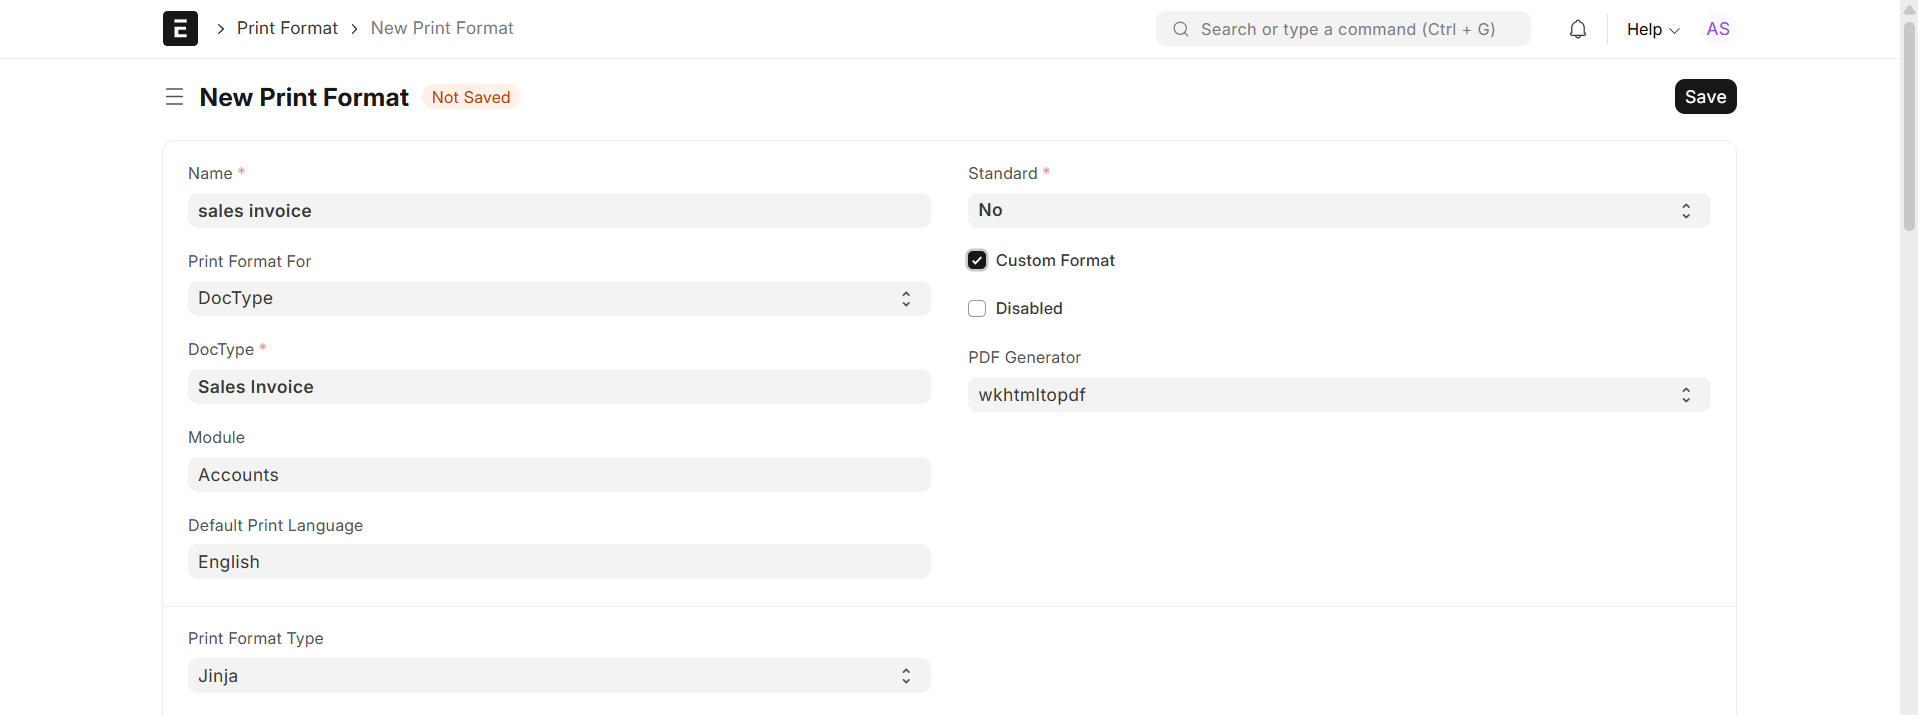
Fill the important fields as below:
- Name: sales invoice (or any recognizable name)
- Print Format For: DocType
- DocType: Sales Invoice
- Module: Accounts
- Standard: No
- Custom Format: Checked
- Print Format Type: Jinja
- PDF Generator: wkhtmltopdf (recommended)
Marking Standard = No ensures that you are not modifying any core format. Enabling Custom Format and selecting Jinja allows you to write your own HTML + Jinja code.
3. Opening the HTML/Jinja Editor
After you save the basic settings, scroll down to the HTML section. ERPNext displays a code editor where you write the entire structure of your print format using HTML, inline CSS, and Jinja expressions.

In this editor, you can define sections such as header, customer and invoice info, item table, totals,
and the footer. Jinja tags like {{ doc.customer_name }} are used to pull dynamic values from the
Sales Invoice document.
3.1 Basic Header with Company Name and Address
Here is an example of a simple header block:
<!-- Header Section -->
<div style="text-align:center; margin-bottom: 12px;">
    <h2>{{ doc.company }}</h2>
    <p>{{ doc.company_address }}</p>
</div>
This header displays the company name and address at the top of every invoice. All values come directly from the Sales Invoice document.
3.2 Inserting Customer and Invoice Information
Just below the header, you can add a block for the customer and basic invoice details, such as the customer name and posting date:
<!-- Customer & Invoice Info -->
<p><b>BILLED TO :</b> {{ doc.customer_name }}</p>
<p><b>Invoice Date:</b> {{ doc.posting_date.strftime("%d-%m-%Y") }}</p>
4. Building the Items Table
The most important part of any invoice is the items table. With Jinja, you can loop through all items in the Sales Invoice and print them row by row.
<!-- Items Table -->
<table style="width:100%; border-collapse: collapse;" border="1">
    <thead>
        <tr>
            <th style="padding:4px;">Description</th>
            <th style="padding:4px;">Rate</th>
            <th style="padding:4px;">Quantity</th>
            <th style="padding:4px;">Amount</th>
        </tr>
    </thead>
    <tbody>
    {% for item in doc.items %}
        <tr>
            <td style="padding:4px;">{{ item.item_name }}</td>
            <td style="padding:4px; text-align:right;">{{ item.rate }}</td>
            <td style="padding:4px; text-align:right;">{{ item.qty }} {{ item.uom }}</td>
            <td style="padding:4px; text-align:right;">{{ item.amount }}</td>
        </tr>
    {% endfor %}
    </tbody>
</table>
This code creates a simple four-column table and uses a for loop to render every invoice item.
You can add extra columns (such as tax or discount) based on your own requirements.
5. Previewing the Custom Print Format
Once your HTML and Jinja blocks are ready, save the Print Format and open a Sales Invoice. From the print dropdown, select your newly created print format. ERPNext renders the invoice layout using your template.

At this point, your design might still be basic. The next sections show how to enhance the template by inserting a logo, GST number, and well-structured terms and conditions.
6. Adding Company Logo and GST to the Header
Many businesses want their invoices to include a logo and GSTIN. To insert a logo, first upload the image using ERPNext’s File Manager or Website » Files, then copy the file URL.
6.1 Logo block
<!-- Logo and Company Header -->
<table style="width:100%; margin-bottom: 10px;">
    <tr>
        <td style="width:20%; vertical-align:top;">
            <img src="/files/abc_traders_logo.png" alt="ABC Traders Logo"
                 style="max-width:90px; height:auto;">
        </td>
        <td style="text-align:center; vertical-align:top;">
            <h2 style="margin:0;">ABC TRADERS</h2>
            <h3 style="margin:3px 0 0;">INVOICE</h3>
            <p style="margin:2px 0 0; font-size:0.9rem;">{{ doc.name }}</p>
        </td>
    </tr>
</table>
6.2 GST Number and Billing Line
<p style="text-align:right; margin:6px 0 12px;">
    <b>GST:</b> 2456ASDRG67
</p>

<p><b>BILLED TO :</b> {{ doc.customer_name }}</p>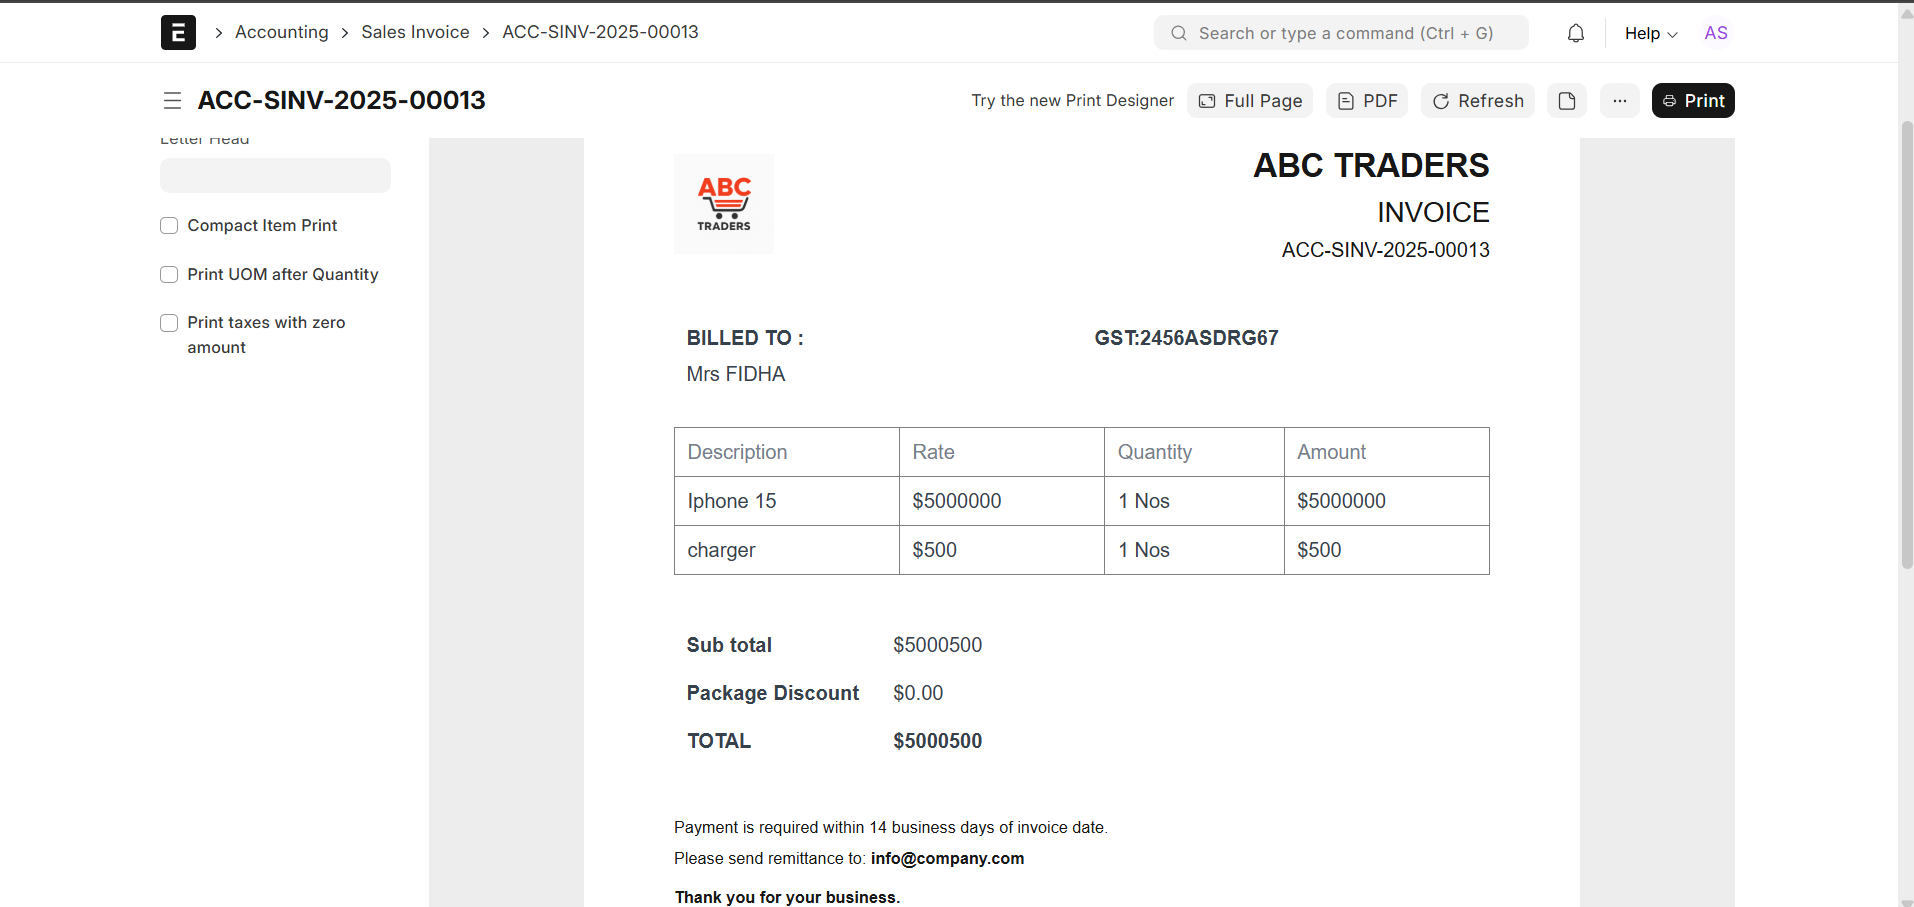
Notice that the logo is placed to the left, while the company name and invoice title are centered. This clean layout is easy to adjust using simple inline CSS.
7. Displaying Totals and Adding Terms & Conditions
After the items table, you typically show the subtotal, discounts, taxes, and the final total. Here is an example of a small summary block:
<!-- Totals Section -->
<table style="width:40%; margin-left:auto; margin-top:12px;">
    <tr>
        <td style="padding:4px;"><b>Sub total</b></td>
        <td style="padding:4px; text-align:right;">{{ doc.net_total }}</td>
    </tr>
    <tr>
        <td style="padding:4px;"><b>Package Discount</b></td>
        <td style="padding:4px; text-align:right;">{{ doc.discount_amount or "0.00" }}</td>
    </tr>
    <tr>
        <td style="padding:4px;"><b>TOTAL</b></td>
        <td style="padding:4px; text-align:right;"><b>{{ doc.grand_total }}</b></td>
    </tr>
</table>
7.1 Terms & Conditions Block
Many organizations like to print payment terms, return policies, or liability clauses at the bottom of the invoice. In your example, the terms look like this:
<!-- Terms & Conditions -->
<div style="margin-top:28px; font-size:0.9rem;">
    <h4 style="margin:0 0 6px;">TERMS & CONDITIONS</h4>
    1-Payment is due within 14 business days from the invoice date unless otherwise agreed in writing.<br>
    2-Goods once sold are not eligible for return or refund, except in cases of manufacturing defects
      reported within 48 hours of delivery.<br>
    3-Delayed payments may incur additional charges, including interest or late fees as per company policy.<br>
    4-ABC Traders is not liable for any damages or losses arising from improper handling, misuse,
      or third-party transportation after delivery.
</div>

<p style="text-align:center; margin-top:24px; font-weight:600;">
    Thank you for your business.
</p>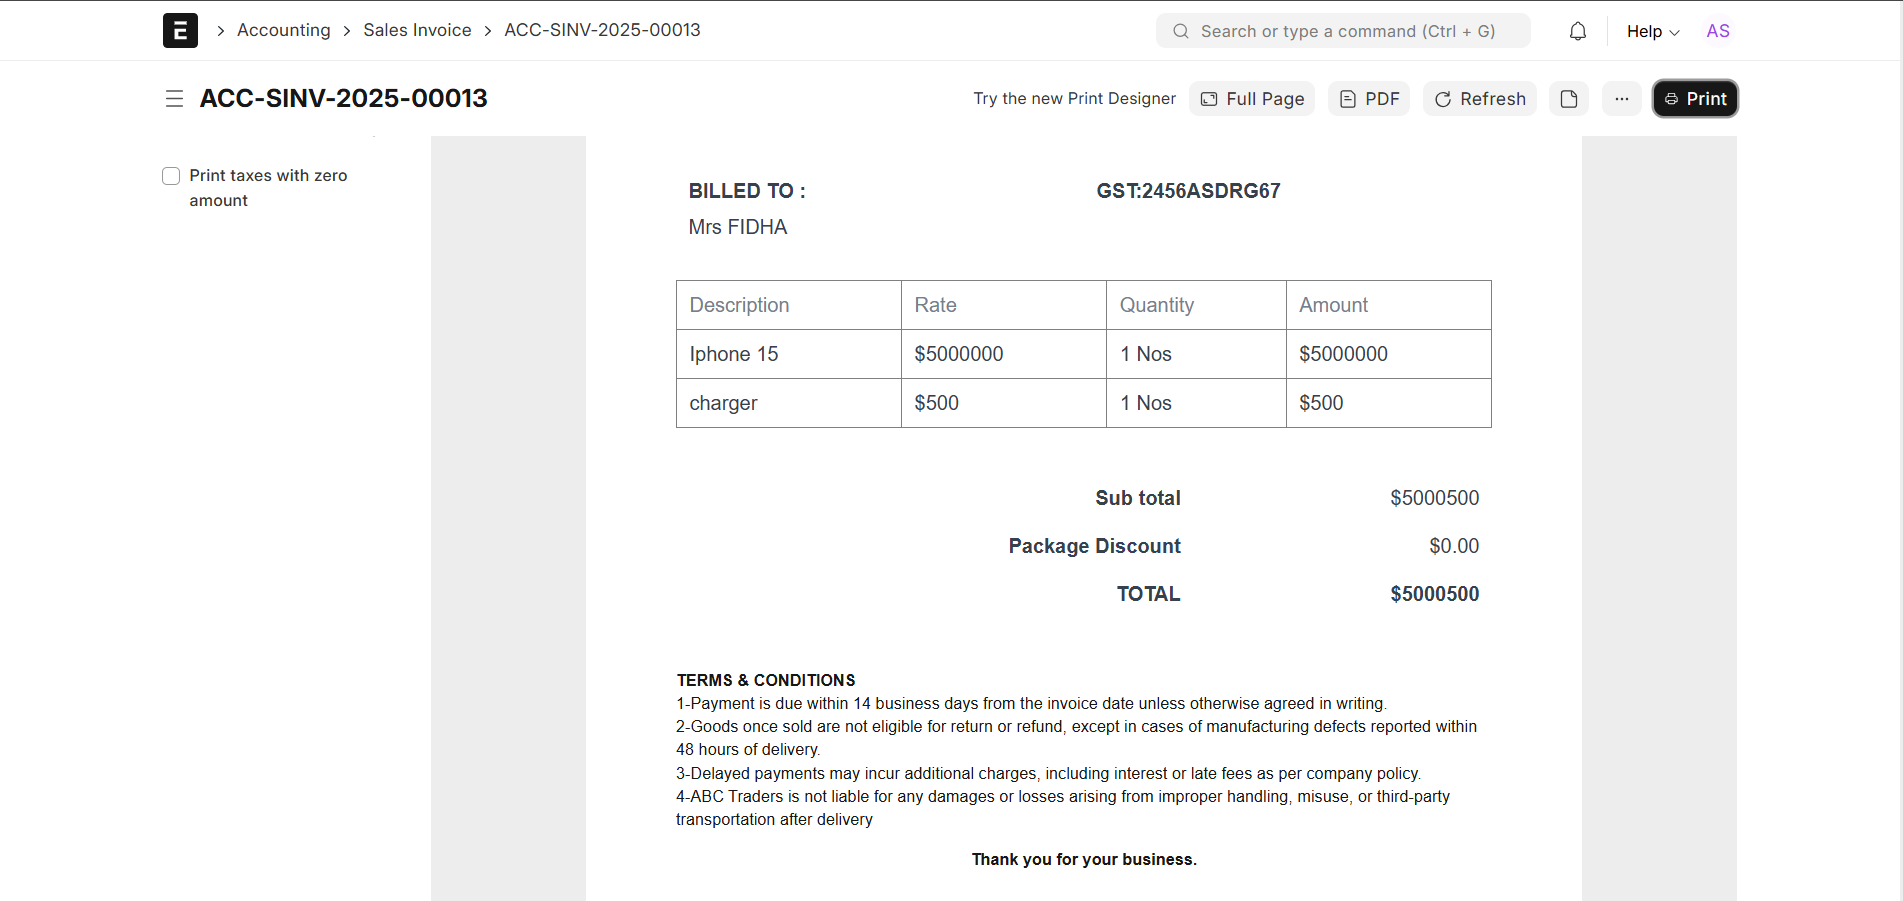
This section is fully static text, but you can also pull in a Terms and Conditions template from ERPNext if you want to manage the content centrally.
8. Printing and Exporting to PDF
When you click Print or PDF from the Sales Invoice, ERPNext passes the rendered HTML to your browser or PDF engine. The browser’s print dialog allows you to select the printer, set margins, and adjust page size.
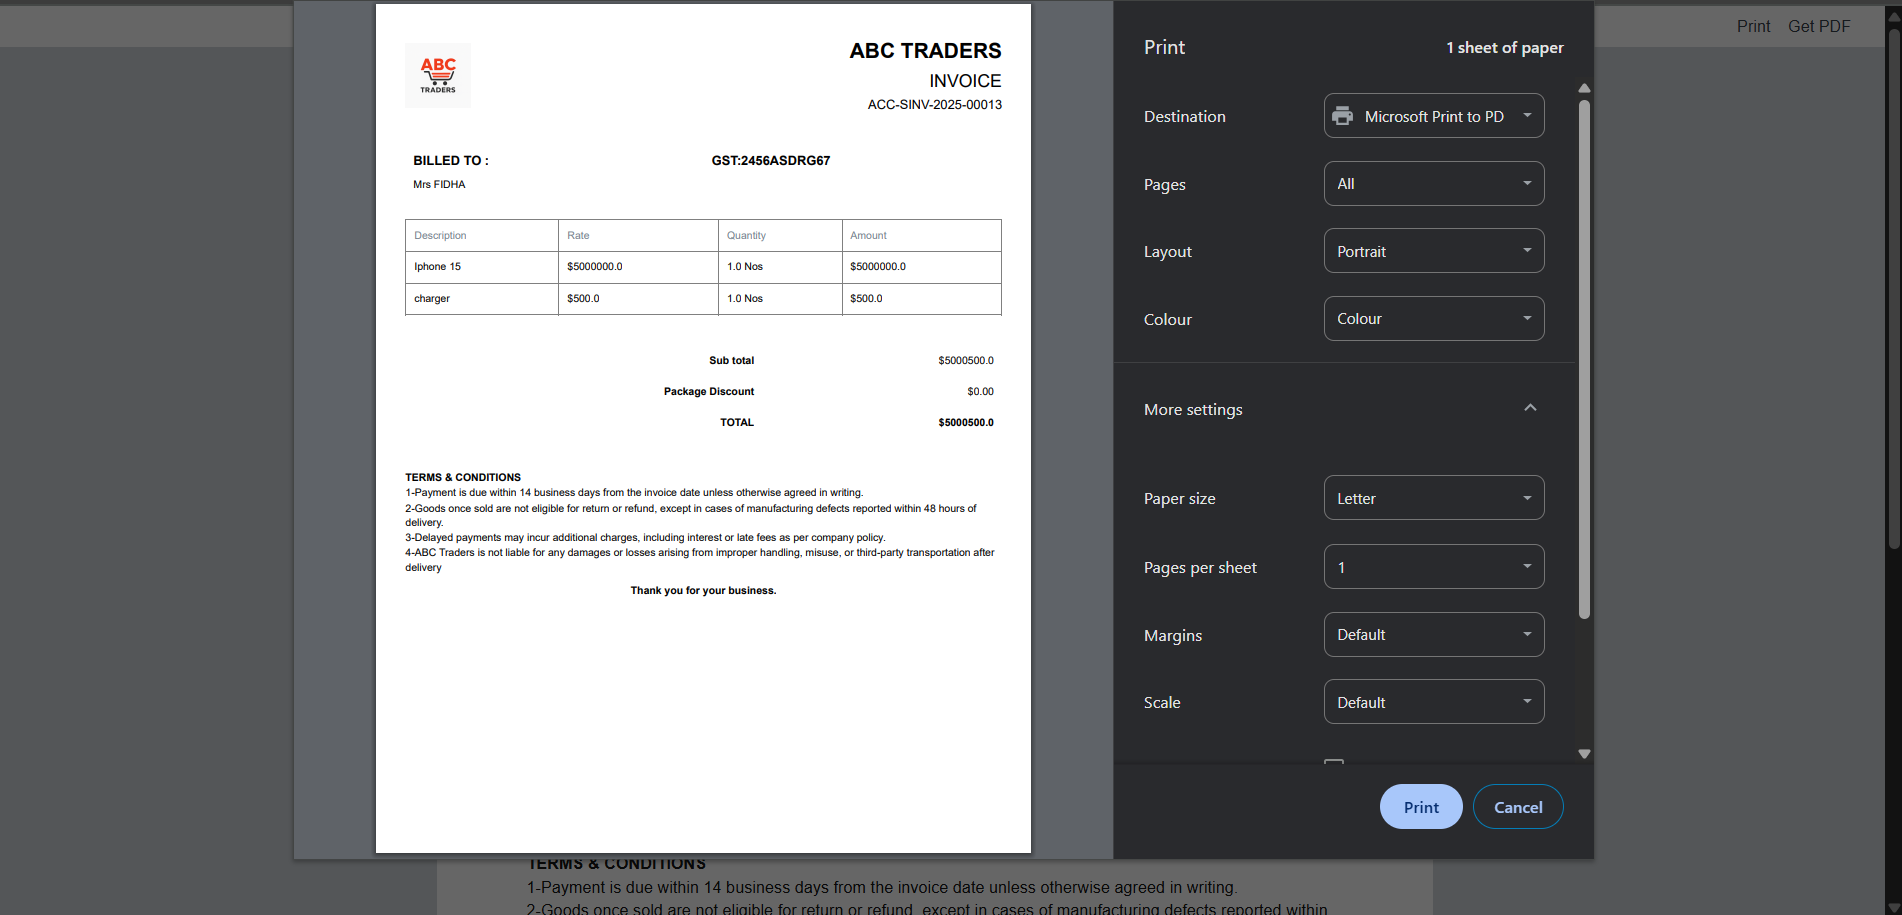
If the content looks too small or too large, you can:
- Change the Scale option in the print dialog, or
- Adjust fonts, paddings, and table widths inside the HTML/Jinja template.
9. Handling Common Errors in Custom Print Formats
9.1 Error: Unknown column 'letter_head_image'
In your earlier attempt, you may have used a snippet like:
{{ frappe.db.get_value('Company', doc.company, 'letter_head_image') }}.
Newer ERPNext versions no longer expose this field in the Company doctype, which leads to the SQL error:
(1054, "Unknown column 'letter_head_image' in 'field list'")
Instead of relying on letter_head_image, use one of the following approaches:
- Upload the logo as an independent file (e.g.,
/files/abc_traders_logo.png) and reference it directly. - Use a Letter Head document and leverage its HTML content if you want more complex headers.
<!-- Using direct file path -->
<img src="/files/abc_traders_logo.png" height="80">
This approach is simple, stable across versions, and easy to maintain.
Conclusion
ERPNext’s print format system gives you complete control over how your documents look, from basic invoices all the way to complex multi-page forms. By combining HTML, Jinja, and lightweight inline CSS, you can produce professional layouts tailored to your brand and business requirements.
In this guide, you learned how to:
- Access and create custom print formats from the Print Format list
- Configure a new Jinja-based template for Sales Invoice
- Write HTML + Jinja to render headers, item tables, totals, and footers
- Insert logos, GST numbers, and clear terms & conditions
- Resolve the
letter_head_imagefield error by using a direct image URL
Once this base template is stable, you can duplicate it and build variations for quotations, delivery notes, or pro-forma invoices. Because everything is just HTML and Jinja, developers and power users can iterate very quickly and keep the formats in Git or other version control systems as part of their ERPNext customization layer.
can i share with u my invoice temaplate and u help me